Thanh’s Amazing Lemon Drizzle Friands

20140622-163838-59918489.jpgThese little cakes achieved almost legendary status in an online foodie group I am part of. And with reason: these beauties are the stuff of dreams. They have a (deceptively) light texture, a perfect, delicate lemon flavour, and even though they look and taste like someting Marie-Antionette herself would not have sniffed at, they are not hard to make. The basic ingredients are ground almonds, egg whites, butter and icing sugar, in this case flavoured with lemon zest and lemon icing.

20140622-163834-59914206.jpg

Before my friend Thanh posted the recipe for these almond cakes on her gorgeous blog I had never heard of friands. That all changed, because after making these once I knew I had to have the baking equivalent of the Holy Grail, a ‘proper’ friand tin. Of course you could easily make these in a muffin tin but the oval, flower-emblazoned tins (individual or as a 12-hole tin) are the real deal. Although they are French in origin, for some reason friands are very popular in Australia, which means the tins are widely available over there, as opposed to over here, where they are more of a lucky find.

20140622-163835-59915690.jpg20140622-163834-59914999.jpg

The reason I am posting about these friands now is that I was given 6 individual friand tins (avec flower) by my lovely friend Kelly-Jane last week, and I have a 12-hole tin winging its way to me all the way from Adelaide, sent by my equally lovely aunt and uncle. I did not plan it like this, I am just surrounded by great people. 🙂

20140622-163836-59916396.jpg

The first time I made lemon friands I baked them in a silicon financier ‘tin’, which turned them into rectangular bars, and they were gorgeous even then. Baking them in a metal tin makes all the difference, though. Now that I have these tins, and more on the way, I am going to have to get creative with friands but I am sure these lemon drizzle friands will remain a firm favourite.

20140622-163837-59917104.jpg20140622-163837-59917806.jpg

You cand find the recipe here. I follow it pretty much to the letter, but I do add the zest of two whole lemons to the batter for extra zing.

Sourdough: A Kick Starter


20140615-123826-45506438.jpgI couldn’t publish a blog post about sourdough pancakes without giving you a ‘recipe’ for a sourdough starter, so here goes. Creating a starter, or levain, couldn’t be easier. All you need is flour, water, a (plastic) container and a bit of patience. If you are new to sourdough, it pays to observe the process closely because that way you will get to know your starter and get a feel for it as it develops. Or maybe I should say ‘a feel for her/him’ because I think naming the blob is essential. It is after all a kind of pet that will need some tlc every now and again to keep it alive (or regular feeding, anyway). As this starter is made with rye flour, I have baptised it Ryely

I have tried several recipes for starters, including one by Paul Hollywood and one from the River Cottage Handbook: Bread, but the one I am sharing here worked best for me. I used it to create my current starter, Tartarus, who recently celebrated his first birthday. This starter recipe comes from the wonderful Dutch baking blog Uit de keuken van Levine. I have translated it into English for you but if you would like to see the original, you can find it here.

So let’s go raise some fungi!

Day 1

100 g water
75 g rye flour (I used wholemeal when I made Tartarus)
25 g plain flour

Put water and flours in a clean container (I use transparent plastic containers for this, a clean one for each feed).
Mix with a clean spoon, then scrape down the sides with a rubber spatula. Put the lid on (loosely) and leave at room temperature for 24 hours.
At this point, you will have a thick paste. Don’t worry, your starter will look very different in the end. Although this starter is rye-based, you will only be feeding it plain flour in the end.

20140615-123823-45503536.jpgDay 2

20140615-123824-45504278.jpg
You might see some bubbles, you might not. The mixture may smell a bit but that is fine. I have noticed that the smell is stronger if you use rye flour (it reminds me of salami, for some reason) instead of wholemeal flour.

100 g yesterday’s mixture (discard the rest)
75 g water
50 g rye flour
25 g plain flour

Mix with a spoon, scrape down sides, put lid on loosely. Leave for 24 hours.

Day 3

20140615-123825-45505017.jpg
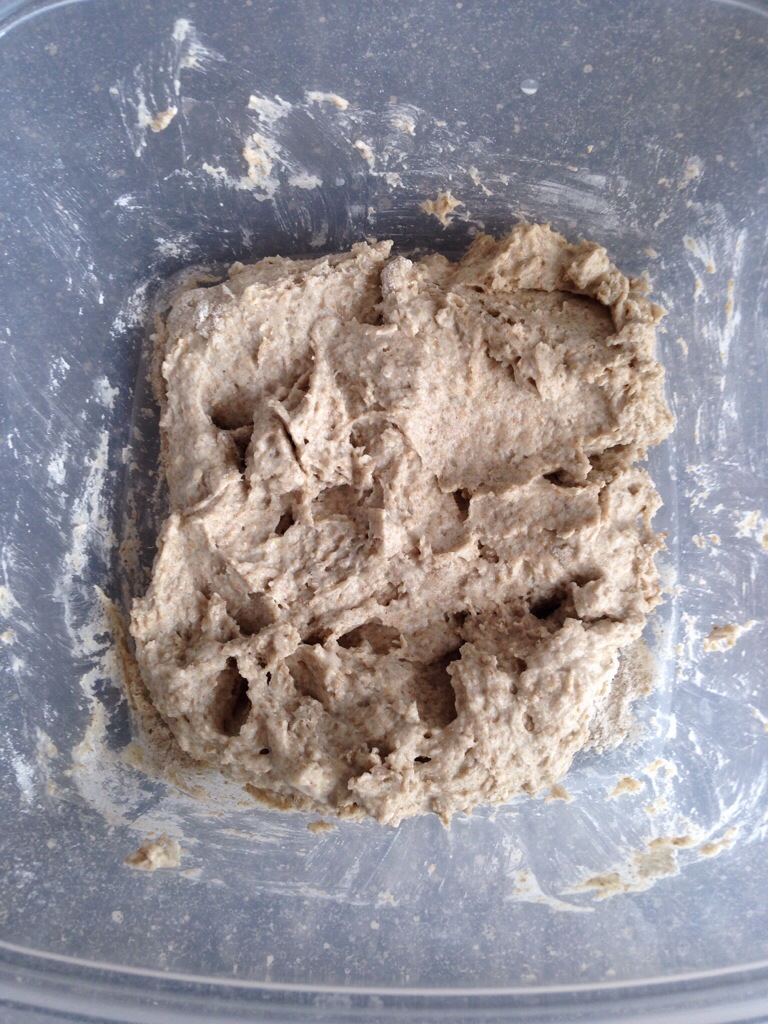
If you are lucky, the mixture is now active and may even have doubled in volume. You may also only see a few bubbles, or nothing at all. Whatever the case, keep feeding/refreshing. In this case, my mixture was already very active and had even bubbled up. Don’t be fooled, however; you do not want to use your starter at this stage.

20140615-123825-45505717.jpg

The sides of the container show that the mixture has bubbled up and fallen.

100 g of yesterday’s mixture
75 g water
25 g rye flour
50 g plain flour

Mix with a spoon, scrape down sides, put lid on loosely. Leave for 24 hours.


Day 4

The mixture should be active and have doubled in volume by now. It may have collapsed to the level it had after the feed on day 3. If the mixture has not doubled, repeat day 3. If it has, proceed as below.

20140615-123827-45507159.jpg

What a difference a day makes. The mixture that was so active yesterday only shows a few bubbles today. I had to repeat day three this time. Don’t worry if you have to do the same.

100 g of yesterday’s mixture (day 3)
75 g water
15 g rye flour
60 g plain flour

Mix with spoon, scrape down sides, put lid on loosely. Leave for 24 hours.


Day 5,6 and 7

20140615-123827-45507888.jpg

Result! The starter is active and will only need a few more feeds before it can be used.

If the mixture has doubled (or even tripled) in volume in the past 24 hours it is almost ready to use. Only feed/refresh with water and plain flour from now on.

100 g of yesterday’s mixture
100 g water
100 g plain flour

Mix with a spoon, scrape down sides, put lid on loosely. Leave for 24 hours.

The starter will get lighter and thinner because you are only feeding it with plain flour. You can speed up the process now by feeding your starter every 12 hours instead of every 24 hours, providing it has risen and fallen in that time. The sides of the container will tell you if it has but you can also use a rubber band for this (see photos below).

20140615-123829-45509341.jpg 20140615-123828-45508592.jpg
If the mixture can double within 6-8 hours on day 7, your sourdough starter is ready to use.

If you need more starter you can feed it more by refreshing 100 g of levain with 200 g water and 200 g plain flour (1:2:2). You can also refresh/feed the part you would otherwise discard.

My starter usually lives in the fridge and can go without feeding for up to two weeks, although I usually feed it once a week. I do tend to feed and discard once before using it in bread if it has been in the fridge without a feed for that long. If the starter has split and there is water on top, simply mix with a spoon, discard and feed. Or make sourdough pancakes, of course.

There is so much more I would like to tell you about keeping a starter happy and baking with it, but I couldn’t possibly cover all that in one post. I am no expert on the subject but if you have any questions, please don’t hesitate to ask them.

Oven-Baked Crispy Curried Tofu Slices

20140610-174454-63894883.jpgWhen people ask me the ubiquitous protein question all vegetarians and vegans are faced with, I tend not to start my answer with ‘well, there’s tofu’. Not because I don’t want to see that face most people pull when they hear the dreaded T word but because I have a love/hate relationship with the stuff myself.

It’s mainly a texture thing. The idea of eating soft silken tofu, for instance, makes my skin crawl. For me there are three ways of preparing tofu that turn it into a treat.

The first one is lazy and easy: I buy ready-cubed, ready-marinated tofu bits that have (somehow) been dried out a bit. They are perfect for stir-fries and salads once you’ve fried them.

The second method is deep-frying. Now of course a good deep-frying will make almost anything edible, but tofu and a vat of hot oil really go well together. Fuchsia Dunlop has some great recipes for deep-fried tofu in her excellent book Every Grain of Rice. But, as we all know, deep-frying isn’t overly healthy, so deep-fried tofu is a treat reserved for special occasions.

Which brings me to the third way of preparing tofu, which is baking. It is easy, healthy and, most importantly, delicious. I have to thank my friend Caroline here, because she is the one who put me on to this method (she has a gorgeous food blog herself, by the way: http://thepatternedplate.com). I am a big fan of using the oven. Less work, less splattering, and there aren’t many foods that don’t benefit from being baked.

20140610-174454-63894065.jpg

So texture is important but, as far as I’m concerned, tofu needs a bit of spicing up, too. Plain tofu has a bland flavour that I don’t dislike, but I prefer it as an undertone. As the firm tofu I generally use is porous, it will absorb a marinade, so my first instinct was to drain, slice and then marinate it overnight, giving it maximum flavour. It didn’t work out that way. The tofu absorbed most of the marinade, which meant it had flavour but was also heavy and soggy once baked. I like to think of the marinade I use in this recipe as a coating that delivers flavour and is at the same time the glue for the curry-flavoured breadcrumbs.20140610-174455-63895619.jpg

I have been planning this post for some time and have made several batches of these baked tofu slices to make sure this recipe won’t disappoint. I have tried them with and without the breadcrumb coating, left the tofu to marinate overnight, I have frozen and later baked a marinated batch, turned and not turned them as they were baking, and I am glad to say I am very happy with the result. I was trying to create slices of tofu that were crispy on the outside and a bit chewy on the inside, with bags of flavour, and I think I’ve succeeded. The slices may feel and look a bit soft when they come out of the oven, but they firm up as they cool.

20140610-174456-63896348.jpg

Draining tofu. I gently squeeze the tofu myself first, then put it between two chopping boards with a double layer of kitchen towel beneath and on top of the tofu. I refresh the kitchen towel after 30 minutes and drain for an hour in total. Weigh down with whatever is handy. You want the tofu to keep its shape, so don’t put anything too heavy on it.


Serves 2 generously

Ingredients

325 g block of firm tofu (the type that comes in a pack filled with water), drained for an hour, then sliced into 1 cm slices

20140610-174614-63974211.jpgMarinade
3 tbsp kecap manis (or dark soy sauce)
generous splash of Sriracha or other hot sauce (optional)
2 tbsp lime juice
½ tbsp ginger syrup
1 tbsp garlic oil
generous pinch of salt


Coating
30 g/6 tbsp Panko breadcrumbs
1 heaped tsp mild curry powder

Preparation

– Mix all the ingredients for the marinade in a flattish container or bowl and add the tofu, preferably in a single layer, turning to coat both sides. Marinate for 30 minutes while you heat up the oven to 190°C.
– Mix the ingredients for the coating on a plate.
– One by one, dip the marinated tofu slices in the coating and turn, covering them on all sides.
– Lay the slices on a baking tray lined with baking parchment.
– Bake for 30 minutes and serve.

I like to eat these with egg-and-pea-fried rice and a salad.


Creamy Mushroom, Spinach and Pine Nut Tagliatelle (with a vegan option)

20140606-202811-73691371.jpgI have been making versions of this dish ever since I was a student, so for quite some time. It makes sense that I started cooking it in those days because it is quick, adaptable and (very important to me at the time) relatively cheap. I definitely wasn’t going to splash out on food if I could spend my money on beer. It is also an easy dish to make, not requiring too much time in the kitchen, which also suited me just fine at the time. Not because I disliked cooking (although I was far from a foodie) but because most of the kitchens I cooked in back then were absolutely filthy. This was entirely due to my housemates’ sloppiness, of course. Nothing to do with me. 😉

20140606-202810-73690657.jpg

In fact, I think it was the state of those kitchens that made me turn this dish from a meaty platter into a vegetarian one. Going vegetarian was the furthest thing from my mind at the time, but there was one particular students’ house I lived in where I genuinely didn’t think it was safe to prepare meat. Needless to say, I ate out a lot and didn’t live there for very long.

So this creamy mushroom tagliatelle had lots of things going for it when I was living in squalor but most importantly it was, and is, delicious. Which is the reason why I still cook it today. As to who gave me this recipe, I don’t really remember (did I mention the heavy drinking going on at the time?). I know a friend of mine, who later became a housemate, also cooked it but whether I got it from her or the other way round… It’s all a bit of a blur.

20140606-202807-73687676.jpg

I said I have been making ‘versions’ of this dish, because it is very adaptable. I’ve made it with minced meat or mushrooms (or both), with frozen or fresh spinach, with Boursin cheese or discount faux-cream cheese or simply a splash of cream and some garlic. I’ve subbed the pine nuts with chopped walnuts or just left nuts out altogether. The only thing that hasn’t changed is that I’ve always added a bit of heat in some form or other. I’ve used chilli oil, chilli flakes, etc, but these days I go for a fresh chilli. Deseeded, which I don’t usually do, but I don’t like to think of this as a spicy dish. The chilli just lifts the whole thing and anyway, spinach and chilli were meant to be together as far as I’m concerned.

Another thing I love about this dish is that it’s a great Tuesday night supper but also something I would confidently serve dinner guests.

20140606-202806-73686945.jpg

For a vegan (or lighter) option: Add a large clove of grated garlic to the onions and chilli at the beginning, and instead of adding Boursin, stir in soy cream. I like Alpro Soya Light, which I use for pretty much every recipe that calls for single cream these days. Haven’t tried it in this dish yet, so I can’t give you exact measurements, but I think 100/125 ml should do it. And you’d want your pasta to be eggless, obviously. But you don’t need me telling you that.

20140606-202805-73685515.jpg

20140606-202806-73686208.jpg

One last thing: you could just throw in the raw mushrooms after you’ve cooked the onion and chilli and fry them like that. I certainly did when I was cooking in septic kitchens, but I really think that frying them separately makes all the difference.

So without further ado, here is my creamy mushroom, spinach and pine nut tagliatelle.


Serves 2 generously (easily doubled)

Ingredients

250 g chestnut mushrooms, sliced

(garlic) olive oil

1 large onion, finely chopped

1 fresh red chilli, deseeded, finely chopped

180 g tagliatelle

350 g frozen spinach (not creamed) , thawed and lightly drained

3 tbsp (30 g) pine nuts, toasted

80 g Boursin cheese, the garlic and herb variety


Preparation

– Put a large pan of hot water (it saves time) on to boil.

– Fry the mushrooms in a largish frying pan. Sprinkling them with a bit of salt makes them yield their juices a bit quicker. Transfer to a plate and leave.

– The water should be boiling by now, so cook your tagliatelle while you make the sauce

– In your mushroom pan, fry the onion until translucent, then add the chilli and fry a little bit longer.

– Add the mushrooms and spinach and stir until everything is warmed through. Season to taste.

– Stir in the Boursin cheese.

– Drain the pasta when it is done, reserving half a cup (125 ml) of the starchy cooking liquid.

– Stir the pine nuts into the mushroom mixture, then add the pasta and mix. If it all seems a bit dry, add some of the pasta liquid.

Michelle’s Gorgeous Curried Roasted Cauliflower and Potato Salad

20140604-195007-71407636.jpgSometimes you come across a recipe that just speaks to you straight away. This happened to me recently when I was browsing a blog that was new to me: Michelle Nash’s The Complete Savorist http://www.thecompletesavorist.com/. She posted a recipe for a Curried Roasted Cauliflower and Potato Salad that I wanted to make as soon as I saw it. I liked the idea of roast cauli and roast potatoes as the basis of a potato salad. I usually boil my potatoes when making a potato salad, but I don’t think I’ll go back to that method after cooking it this way.
20140604-195005-71405529.jpg

After making the dairy-free potato salad ‘tartare’ from Veg Everyday (a book I would recommend to anyone interested in vegetarian cooking), I wasn’t really looking for one made with yoghurt or mayo. But the addition of curry powder, which reminded me a bit of egg salad (for better or for worse), made me want to try it. And it really worked.

20140604-195006-71406237.jpg

I was originally going to fry a veggie burger with this salad, but as it is quite substantial and the eggs provide protein, I decided it could stand on its own as a main. And it did, a lovely main I will definitely be making again. This salad would also make a perfect side dish for a barbecue. I made a few changes, some to suit my own preferences and some because I either had something that needed using up or because ingredients weren’t available over here.

20140604-195006-71406931.jpg

You can find Michelle’s recipe here: http://www.thecompletesavorist.com/cooking-blog/curried-roasted-cauliflower-and-potato-salad
Seeing as I bought a bag of garlic salt at a fair last weekend, I decided to use that instead of garlic granules, which I can’t get over here. We do have garlic powder, which I suppose is the same thing, only more finely ground.

20140604-204603-74763184.jpg

The garlic salt I bought. I really liked it. Shouldn’t be difficult to make yourself. I would mix garlic powder with fine sea salt and add some ground pepper, paprika and thyme. There is also sugar in it, but I don’t really see the point of that, to be honest. And another recipe is born. 😉


I couldn’t find dill pickle relish so I added some chopped gherkins, also to add a bit of sour to the balance of flavours, and subbed the pinch of sugar with a splash of maple syrup. I had half a bag of new potatoes left, so I used them instead of larger potatoes. The added bonus is that all you have to do is scrub them and chop the larger ones in half. I baked the caulifower and potatoes on separate trays because I wasn’t sure if they would both be done in thirty minutes, but everything was cooked to perfection when I took it out of the oven. Just to be on the safe side, I would advice you to use two trays (oven allowing), so you could leave the potatoes in a bit longer, if necessary.

When it comes to sauces I am a bit of a minimalist; I like a really light coating. I used 350 g of Greek yoghurt and 70 g of mayonnaise but will go down to 200 and 50 next time. I have given those measurements in my take on the recipe, below.

Which only leaves me to thank you for your recipe, Michelle. I love it and it will be a regular at ours this summer.


Ingredients

½ head of cauliflower, cut into small florets

500 g new potatoes, scrubbed, larger ones halved

olive oil

garlic salt, or garlic powder, fine sea salt and pepper (I used 1 tsp in total)

2 stalks celery, finely chopped

3 smallish gherkins, finely chopped

3 tbsp chives, finely chopped

4 hard-boiled eggs, sliced in wedges

salt and pepper

⅓ tsp paprika

200 g Greek yoghurt

50 g mayonnaise

dash of maple syrup of pinch of sugar (optional)

1 heaped tsp curry powder


Preparation

– Preheat the oven to 190°C. Put the cauliflower and potatoes in a bowl and add garlic salt (or garlic powder and salt), pepper and olive oil. Mix, making sure everything is coated. Pour them out onto a baking sheet in a single layer.

– Using the same bowl, add the potatoes, garlic salt, pepper, and olive oil. Mix, making sure all the potatoes are coated.  Spread them out on a separate baking sheet.

– Bake the cauli and potatoes for 15 minutes, then turn both and bake another 15 minutes. Leave to cool.

– Mix the potatoes, celery, and gherkins in a large salad bowl (or plate).

– Beat the Greek yoghurt, mayonnaise, maple syrup, paprika and curry powder together in a separate bowl. Pour this over the potato mixture and toss. Season to taste.

– Add the cauliflower and mix gently.

– Sprinkle the chives over the salad and top with the eggs.

A Tale of Two Sauces

I love chilli in any shape or form. Fresh chillies, chilli oil, smoked chillies, chilli powder, chilli flakes, dried chillies, jalapeño, Scotch bonnet, habanero, bird’s eye… Well, you get the idea. So it follows that the my favourite sauce would be a… yes, chilli sauce. But it has to be hot; supermarket sweet chilli sauce does nothing for me. My favourite shop-bought hot sauce is Sriracha, which I buy in bulk because I am genuinely afraid withdrawal symptoms will set in if I don’t get my daily fix. Let’s not find out if I’m right. A more recent contender for best shop-bought chilli sauce (well, chutney) is one I was introduced to by my lovely friend Karen Marie: SimplyaddChilli, a Scottish chilli/strawberry chutney that is out of this world. Thank you for feeding my habit, Karen!

However, as with all food, nothing beats making your own. I have tried quite a few chilli sauce recipes over the years and so far, these two sauces, created by two very different cooks, are my favourites. The first is a sauce from Madhur Jaffrey’s Eastern Vegetarian Cooking, which I first bought as a paperback but soon realised I had to have in an (out of print) hardback version I ordered second-hand from Amazon. The second one is Nigella Lawson’s Jumbo Chilli sauce from Kitchen, which is my easily my most-used book of hers. Both recipes are easy to miss; Nigella’s is one of three recipes in a section about sauces, and Madhur’s is part of her ‘scrambled eggs with spicy tomatoes’, the sauce being the spicy toms.

The Jumbo Chilli Sauce seems to be more Mexican/Latin American in origin, while the Spicy Tomatoes are, as Madhur Jaffrey says, decidly Indian. Both have different uses: the thinner Jumbo sauce will work as dip, relish and will zing up any fried, roasted or boiled vegetable. The thicker Spicy Tomatoes are perfect for scrambling eggs in (as in the book) or to put in an omelette. What they have in common (apart for some overlap in ingredients), it that they both make excellent pasta sauces.

You can find Nigella Lwason;s recipe on her website

20140602-204456-74696786.jpg

20140602-204458-74698186.jpg

20140602-204456-74696079.jpg

20140602-204457-74697483.jpg

20140602-204458-74698882.jpg

20140602-204459-74699573.jpg